TABLE OF CONTENTS
SD Card Replacement:
To access the SD card on your AOC DAKBoard Wall Display, follow the steps below
- Lay the Wall Display down with the back facing upwards. The back of your display will look similar to the photo below:

- If your display has a cover with the DAKboard logo, it will pop off with a little bit of pressure, this will reveal the Raspberry Pi computer. You will then need to carefully remove the HDMI cable that plugs into the Raspberry Pi marked by the arrows in the image below. You may also need to remove the mounting posts so you will be able to lift the Pi to remove the SD card, marked by the Circles in the image below. Once you remove the CPU, place it on the left side (looking down at it) the SD card is visible in the Square in the image below:
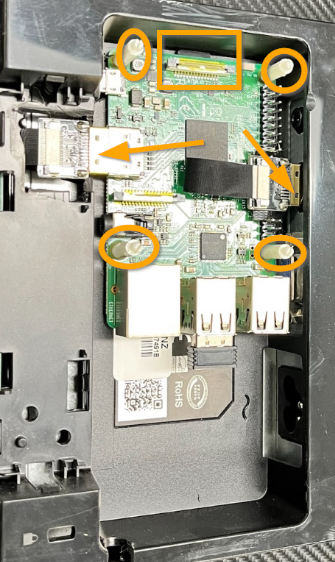
- The card should be easy to pull out. Upgrade the existing card or replace the card with a new one containing the latest OS.
- Be careful not to force the card in, as they can be a little delicate.
- Place the Pi back down and insert the HDMI cable again. Put the mounts back in if your unit had them.
- You can now power on the device and follow the setup instructions on the screen.
Helpful Articles:
Having trouble? See if these articles help:
Wall Display 27 and V2 Plus (Mid-2022 and Newer) SD Card Replacement
V2 and V2 Plus SD Card Replacement
DAKboard Touch 22 SD Card Replacement
DAKboard Mirror Display SD Card Replacement
Dell 27" Wall Display SD Card Replacement
Raspberry Pi - Download and Install the DAKOS
Orange Pi - Download and Install DAKOS