TABLE OF CONTENTS
- Predefined Screen:
- Custom Screens:
- Navigating the New Calendar Interface:
- Frequently Asked Questions:
- Why is my Screen or Display showing "No Calendar URLs Defined"?:
- Why am I only seeing Calendar Loading on my Screen or Display?:
- Why is my Calendar Loading a Blank Space?:
- Am I able to view a Full-year Calendar using my DAKboard?
- Can you view the Calendar Fullscreen?
- Why can I see Events on my Predefined Screen but not on my Custom Screen?
- How do I Display a Calendar without Events?
- Can I add an Automatic Scrolling effect to my Calendar Block?
- How do I use a Touchscreen to scroll through Multiple Months?
- Can I add events from my DAKboard Screen to my Calendar?
- Is it possible to add a calendar block that only displays All Day events?
- Why does my Calendar only show some of my appointments?
- Helpful Articles:
This article is here to explain how to add a Calendar Block to your DAKboard Screen. We will cover the difference between adding a Calendar Block to a Predefined Screen or your Custom Screen. Check out the How To articles in our support article section called Calendars to see how to add specific Calendar Accounts to your DAKboard once your Calendar Blocks are enabled.
Predefined Screen:
The Predefined Screen is available to use with your Free, Essential, or Plus Subscription plans. Adding a Calendar to this requires you to use the Predefined Screen Editor on your accounts' Screens page.

Log in to your account, click the Screens tab on the left side of your main page, then click on the Predefined Screen to open the editor:

Click on the Calendars tab, and toggle Calendar Enable to enable the Calendar Block, then click Save Changes before you leave this tab. See below:

You will now see a new Calendar tab in your Screen editor:

Check out our guides to adding all of our supported calendar accounts.
Removing Calendars from the Predefined Screen:
Depending on whether you need to remove an ICS calendar or one of your authenticated calendars, you can do this from your Calendar Tab. For ICS calendars, you must delete the calendar to remove it by clicking the Minus Sign to the right of the Calendar Link. See below:

This will completely delete the link. For authenticated accounts, you just need to remove the check mark to the left of the calendar you wish to remove. See below:

Make sure you save your changes before you leave this tab to apply them.
Custom Screens:
Custom Screens available on all Paid Subscription Plans are different than your Predefined Screen. With Custom Screens, you can add blocks, place them where you want, size them how you want, and even add as many copies of the block to the screen as you want. You control how you make the screen look and function. This means if you want multiple calendars on a single screen, you can do this.
Start by opening or adding a Custom Screen on your Screens page. All accounts, including the Free Account, will have one Custom Screen already called My Custom Screen. On the Free account, you can explore what can be set up on a Custom Screen, but you cannot use this screen. With your Paid Subscriptions, you can use this screen or add another to get started. See below:

Once in the Screen Editor, click the Add A Block button in the upper right corner, then select Calendars on the left or search for the type of calendar source you would like to use:

Size the Calendar block in your Screen Editor, then click the Edit Button in the upper left corner to open the Block Editor. Search and add your desired calendar source:

Check out our guides to adding all of our supported calendar types.
Both the Predefined and Custom Screen Calendar blocks can be customized using their Settings. The Predefined has limited modifications, while the Custom Screens have all the Modifications available at all Paid Subscription levels. Check out our articles Custom Screen Calendar Layouts and Settings, and Content Scheduling to learn more about these options and tabs.
Navigating the New Calendar Interface:
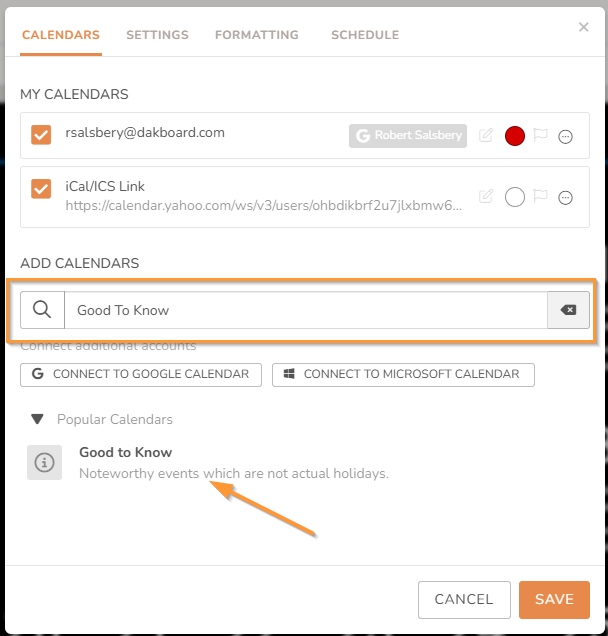
With our latest update to our Custom Screen's Calendar Blocks, you may have noticed a change. We have now made it easier to add, disable, and remove calendars in your block. We have also supplied a large number of preloaded Calendars that do not require you to link your account. These new calendars can be found under the Popular Calendars and Other dropdown menus. The GIFs below will show you how to add a calendar and disable or remove a calendar.
Add a Calendar:
To add a calendar, simply click the dropdown menu in the Add Calendars section and select one of the calendar options. This will move the calendar or the space to add the ICS/iCal calendar link into the My Calendars section, which will display the calendar on your Screen and Display.

Disable or Remove a Calendar:
To Disable the calendar, simply uncheck it, and to remove it, click the Minus symbol at the end of the calendar and select Delete. Deleting the calendar will not remove your Authentication for your Google or Microsoft calendars; it will just move the calendar back to the Add Calendars section. Deleting an ICS/iCal file will remove the calendar completely.

To remove an authenticated account from your DAKboard account, see our article Remove or Reauthorize External Apps.
Calendar Search:
The Calendar Search bar, seen below, can be used to find calendars associated with the Calendar Block:
This is helpful if you want to find one of the preloaded calendars, or just find a specific calendar in the list of your Personal calendars/calendar accounts:
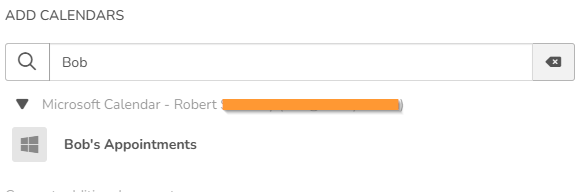
The calendar account must be linked to your DAKboard account before you can use it to find the Calendar. See the Links in the Helpful Articles section below to learn how to add your external accounts.
Frequently Asked Questions:
Below are some of the more common questions we are asked and how to correct these issues when you see them:
Why is my Screen or Display showing "No Calendar URLs Defined"?:
This message only happens when you do not save your changes to apply the new calendar you added to your screen, or if your Calendar URL's authentication has been removed and needs resetting. Go back to your screen editor, open your Calendar Block editor or tab, and make sure your Calendar has been added to the My Calendars section of the block editor, or you have it selected in the Connected Calendar section of the Predefined screen. Once the calendars are selected, make sure to save your changes. If the calendar is already selected, you may need to reauthorize your account. If you use a Google or Microsoft calendar, use our article Remove or Reauthorize External Apps to reauthorize your account. If you are using ICS/iCal calendars like Apple, Cozi, Yahoo, or others that we support, see the corresponding article in the Calendars Support Article section to see how to recreate your ICS/iCal link.
Why am I only seeing Calendar Loading on my Screen or Display?:
If you see the Calendar Loading... message and it fails to go away, this could be a sign of a network connection issue or a weak WiFi signal at your DAKboard. Though other devices in your home may still be connected to your WiFi and able to access the internet, your DAKboard OS device may not. You can see your display's Last Connect time and WiFI signal strength by going to your Displays & Devices tab, clicking the three dots to the right of the display, and opening the Settings tab. For the Last Connect time, any DAKboard OS device reporting less than 6 hours is considered connected; over 6 hours, and your display is no longer connected to your account. Rebooting it should resolve the issue. To check your WiFi signal strength, mouse over the WiFi symbol. A value between 0 and -67 dBm is considered good, with values closer to 0 being better. If you are at or above -50 dBm, you may start experiencing loading or connection issues. See our article Trouble Connecting To A WiFi Network for details on how to improve network connectivity.
Why is my Calendar Loading a Blank Space?:
This most commonly occurs when using the Agenda or Up-Next style calendars. These calendars load events differently and, when connected to extremely busy calendars, can lead to the calendars timing out before the load completes. To learn more about how these calendar types differ, see our article Custom Screen Calendar Layouts and Settings. To get around this, try adding the Show Every Day option in the Calendar Block settings. This will then only load the events up to the selected number of days, rather than loading a full 90 days' worth of events.
Am I able to view a Full-year Calendar using my DAKboard?
The most you can see in advance is 90 days on the Agenda or Up-Next Calendar and up to 6 Months on the Monthly or Big Monthly calendars. The Weekly calendar will only show the current week.
Can you view the Calendar Fullscreen?
With Custom Screens and the Calendar Block, you can size your Calendar to fit your entire Screen. The Predefined Screen cannot do this, as you are limited to the Predefined Layouts.
Why can I see Events on my Predefined Screen but not on my Custom Screen?
This may be due to the option to View Private Events that is available on the Custom Screens, but not on the Predefined Screen. This option is disabled by default on all Custom Screens and will hide any events in your calendar that are marked as private. Since the Predefined Screen does not have this option, it will automatically show all events in your calendar, even if they are marked as private. To correct this, you need to enable this option on your Custom Screen. See our article Custom Screen Calendar Layouts and Settings for more details on this option.
How do I Display a Calendar without Events?
Depending on what kind of calendar you are using, Authenticated or iCal/ICS calendars, displaying an event-free calendar is slightly different. With authenticated accounts (Google and Microsoft), simply create a new calendar and leave it blank. Then assign this calendar to your block. With an iCal/ICS-style calendar, there must be at least one event in the calendar for our system to build the calendar block for you. This event can be far in the past or far in the future. Once you have at least one event in the file, it will be able to make a calendar for you.
Can I add an Automatic Scrolling effect to my Calendar Block?
Some Calendar blocks offer Automatic Scrolling effects, while others do not. However, with Custom CSS, you may be able to add Scrolling effects to any calendar. See our articles Applying Custom Styles to Screens and Applying Scrolling Effect to a Block with Custom CSS to learn how to do this.
How do I use a Touchscreen to scroll through Multiple Months?
With an attached touchscreen, all you need to do is make sure the Calendar is not covered by another block (see our article Block Layers and How to Use Them for details on this), and make sure you have multiple months selected in the Weeks or Days to Show option of the settings page (see our article Custom Screen Calendar Layouts and Settings for more details on this). This way, you have several additional weeks or months that you can scroll through in your calendar.
Can I add events from my DAKboard Screen to my Calendar?
Currently, this is only possible with Google-Authenticated Calendars, and only if you enable the feature. See our article How to Add Your Google Calendars to DAKboard to learn more about this feature.
Is it possible to add a calendar block that only displays All Day events?
It is possible to make only the All-Day events show on your calendar using the Custom CSS available with all paid subscription plans. This will depend on which calendar block you want to target, the Calendar Style, and knowing a little about how to use Custom CSS. To learn more about Custom CSS, see our article Applying Custom Styles to Screens. You can also reach out to our support desk team by starting a Chat with our AI Chatbot and asking to Create a Support Ticket. Our team will gladly help you figure this out and help you get started with custom CSS.
Why does my Calendar only show some of my appointments?
A few things could be happening here. First, your permissions may not be set properly to show your events. You can reauthorize or recreate your Calendar URL to correct this. See our article Remove or Reauthorize External Apps for your authenticated accounts (Google or Microsoft), or see the article How to Add an ICS/iCal Calendar to DAKboard for any calendar using an ICS/iCal URL to learn how to recreate your URL. Second, if you are using a Custom Screen, you may have some Private Events in your calendar. Private events are hidden by default with our Custom Screens. See our article Custom Screen Calendar Layouts and Settings to learn how to View Private Events. Next, you may be trying to view events from a shared calendar. When you link an external calendar to your calendar, you may have permissions to view it there, but those permissions may not extend to DAKboard. Make sure that the owner of the calendar has set it to be publicly viewable, and that when you add it to your Calendar, you also set it to be Publicly Viewable. Finally, make sure you have selected the calendar in your account that contains the Events/Appointments that you are trying to view.
Helpful Articles:
Having trouble? See if these articles help.
How to Add a Calendar Block to your DAKboard Screen
How to Use the Predefined Screen Editor
How to Use the Custom Screen Live Editor
Assign a Unique Calendar Color to Each Calendar
Custom Screen Calendar Layouts and Settings
Remove or Reauthorize External Apps
Applying Custom Styles to Screens