
TABLE OF CONTENTS
- What Is the TouchHub?
- Set Up Your TouchHub
- Using the Dock on Your Display
- TouchHub On-Display Settings
- Frequently Asked Questions
- Is the TouchHub available on all subscription levels?
- Why Can't I Add Another App to My Dock?
- Why Don't My Dock Changes Show on My Display?
- Why Are My Dock Settings Different on Each Display?
- Why Does My Display Open on a Different Dock Item After a Restart?
- Why Doesn't My Slideshow Start?
- Why Does an Item in My Dock Show an Upgrade Page?
- Helpful Articles
The TouchHub is our system for your DAKboard touch screen features and tools. You can use it to quickly navigate between your Screens, use the Home Assistant app, set up a Chores task list for your family, and much more. This article shows you how to build your dock, assign it to a Display, and use the on-display settings, including Slideshow, with answers to common questions.
What Is the TouchHub?
The TouchHub creates a dock that appears at the bottom of your Display. Each icon in the dock opens one of your Screens or one of our touch screen apps, so you can switch between them with a tap on a touchscreen or a click with a connected USB mouse. You build the dock once in your DAKboard account and can assign it to as many Displays as you like.
The TouchHub is available on the Free, Essential and Plus plans. What you can put in your dock depends on your plan:
| Plan | Screens in your dock | Apps in your dock |
|---|---|---|
| Free | Your Predefined Screen only | 1 app: Home Assistant only |
| Essential | Your Predefined Screen and any of your Custom Screens | Up to 2 apps |
| Plus | Your Predefined Screen and any of your Custom Screens | Up to 3 apps (more apps are coming soon) |
Each app can be added to your dock once.
Set Up Your TouchHub:
To set up your TouchHub:
- Log in to your DAKboard account and click the TouchHub tab on the left side of the page.
- In Select Items to Add, click Add App or Add Screen for each item you want in your dock.
- In Dock Configuration, put the items in the order you want and customize their names, colors and icons.
- In Final Dock Preview, click Assign to a Display, check the Displays that should show the dock, and click Assign.
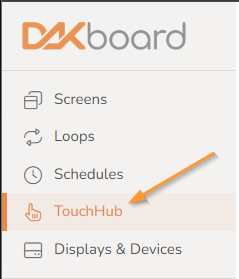
Your changes save automatically. When you first open your TouchHub, it will look something like this:
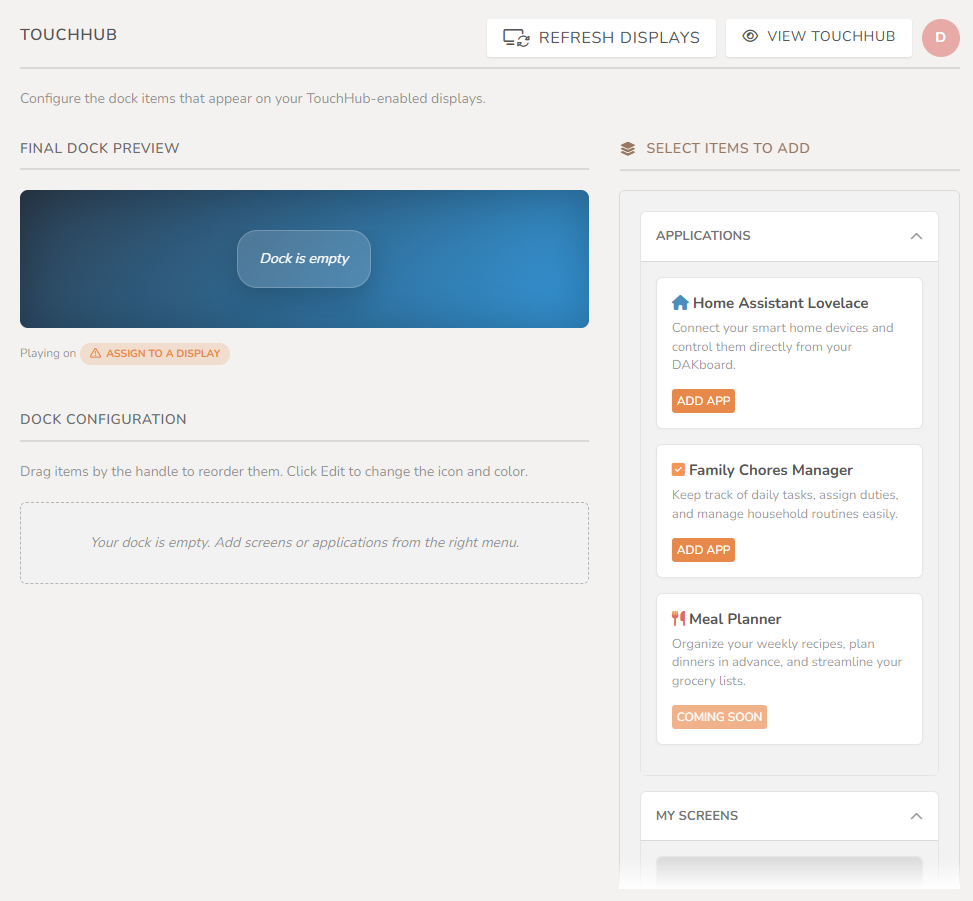
Let's explore each section.
Select Items to Add:
The Select Items to Add section lists everything you can add to your dock. Items already in your dock are hidden from this list.
Applications:
The Applications section contains the full screen apps we have designed for touch screens. Click Add App to add one to your dock. See below:
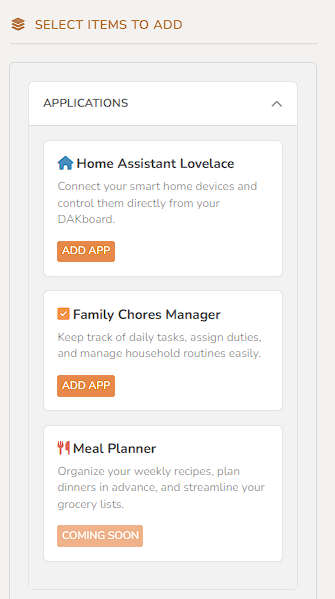
The apps we currently have are:
- Home Assistant Lovelace: With Home Assistant Lovelace, you can quickly access your Dashboard for all your Home Assistant items. Available on every plan. After you add it, click Edit on the item in Dock Configuration and enter your Home Assistant URL. Our article How to Configure Home Assistant for TouchHub will show you how to configure this tool.
- Family Chores Manager: The DAKboard Family Chores Manager can help you set up a Chores list, reward points, and organize your Family in new and fun ways. Available on the Essential and Plus plans. See our article How to use the Family Chores Manager to learn more.
- Meal Planner: With the DAKboard Meal Planner, you can organize your recipes, plan out your meals, and organize your grocery lists. Coming Soon
My Screens:
The My Screens section lets you add your Screens to your dock: your Predefined Screen (marked PREDEFINED) and, on the Essential and Plus plans, any of your Custom Screens. Click Add Screen to add one. See below:
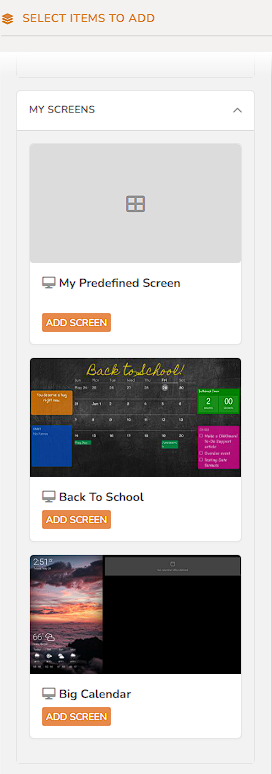
This way, you can switch between your Screens at the touch of a button.
Dock Configuration:
The Dock Configuration section lists the items in your dock. Here you can customize each item, change the order of your dock, or remove items. See below:
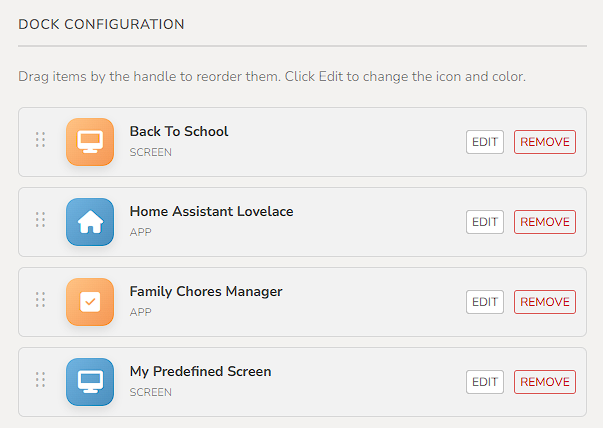
Click the Edit button on an item to open the Customize Dock Item window, as seen below.
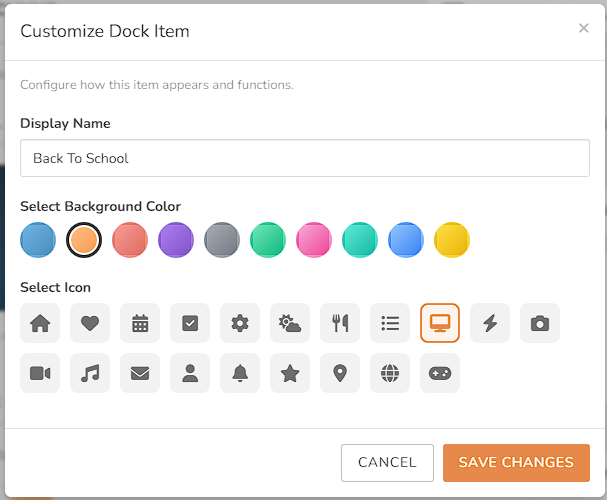
From here, you can change the item's Display Name, choose a new Background Color for its icon, or select a new Icon. For the Home Assistant app, this is also where you enter your Home Assistant URL. Click Save Changes to update the item.
To change the position of an item in your dock, drag it by the handle (the dotted icon) on its left and drop it where you want it. See below:
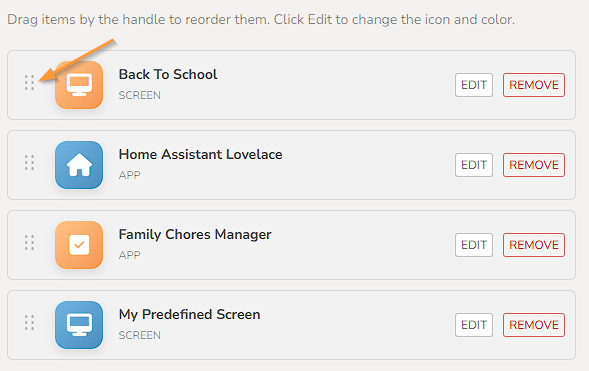
The order here is the order of the icons on your Display, and the order your Slideshow follows. Finally, click the Remove button to take an item out of your dock.
Final Dock Preview and Assigning Displays:
The Final Dock Preview section shows what your dock will look like on your Display as you add items to it. See below:
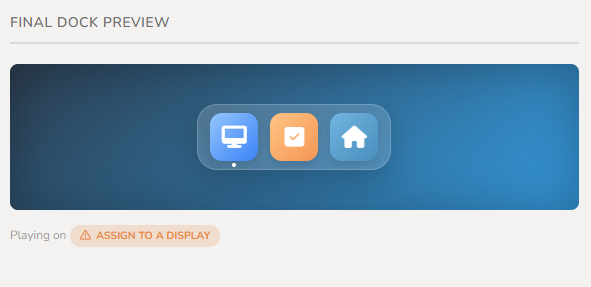
Under the preview, the Playing on line lists the Displays your dock is assigned to. If it is not assigned yet, click Assign to a Display. If it is, click Edit Assignments to add more Displays. This opens the Displays list. See below:
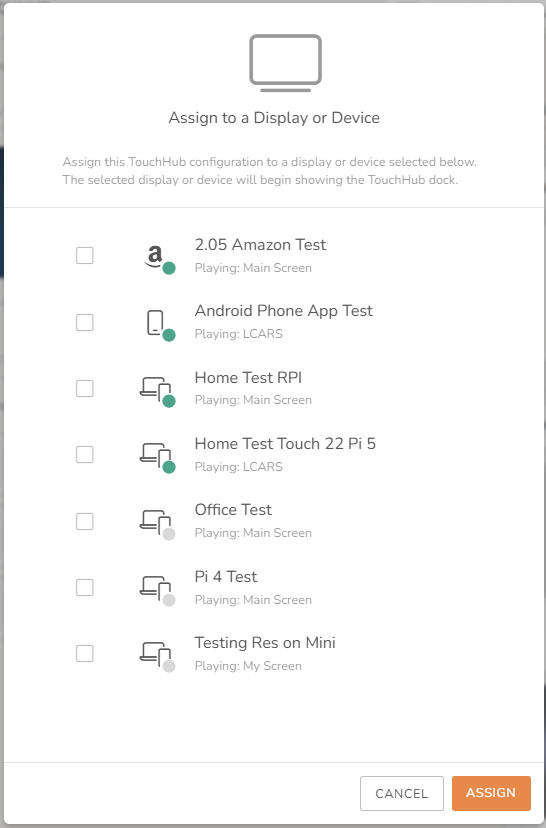
Place a check next to each Display you want to show the dock on and click the Assign button. Your Displays update shortly after you assign the TouchHub, with your dock installed. You can also assign the TouchHub from the Displays page.
Sending Changes to Your Displays:
Changes you make to your dock save automatically, and your Displays pick them up the next time they check for updates. To send them right away, click Refresh Displays at the top of the TouchHub page:
- Plus: your Displays update within moments.
- Essential: your Displays update within about 2 minutes.
- Free: your Displays check for changes about once an hour. To see them sooner, use Reload Content > Reload Everything on the Display.
Using the Dock on Your Display:
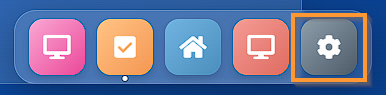
On your Display, tap a dock icon (or click it with a connected USB mouse) to open that Screen or app. At the end of the dock is a Gear icon that opens the TouchHub Settings. See below:
You can also use these gestures on the dock:
- Swipe down on the dock to hide it. To bring it back, swipe up or tap the small handle at the bottom of the screen.
- Swipe left or right on the dock to move it to the left, center or right of the bottom edge. Swiping again toward the edge it is already on hides it to that side. Swipe the other way, or tap the handle, to bring it back.
- With a USB keyboard, the left and right arrow keys move between dock items, and the number keys 1 to 9 open the item in that position.
For more about using a touchscreen, see Touchscreen with DAKboard.
TouchHub On-Display Settings:
Tap the Gear icon in the dock to open the TouchHub Settings. These settings are set up on each Display separately and are saved on that Display, so each Display can have its own choices.
Device Configuration:
The Device Configuration option works with your DAKOS Display. It opens the DAKOS settings so you can adjust your network, display resolution, orientation and other device settings. This will not work with your Bring Your Own Device (BYOD) Displays. See our article DAKOS Display Settings for more details.
Dock Placement:
Use Dock Placement to move your dock along the bottom edge of your Display. Each tap moves it to the next position: center, left, then right. You can also swipe the dock left or right (see Using the Dock on Your Display).
Dock Settings:
Tap Dock Settings to open the Dock Settings menu. These settings are Display-specific, which means what you set on one Display is independent of what you set on your other Displays. They are saved on the Display and stay in place when the Display restarts.
| Setting | What it does | Options and default |
|---|---|---|
| Animation | How the screen changes when you switch dock items: slide across to the selected item, or fade between them. | Slide (default) or Fade. |
| Performance Mode | Matches the TouchHub's visual effects to your Display's speed. Auto detects the device's speed and sets performance to match. Always Reduced reduces motion to lighten visuals and improve performance. Always Full always runs full visuals and animations. | Auto (default), Always Reduced or Always Full. |
| Auto-Return | When the Display has been left untouched for the Inactivity Delay, it goes back to the dock item you choose in When idle, go to. While Auto-Return is on, the Display also opens on that item when it starts up. Cannot be used at the same time as Slideshow. | Off by default. Inactivity Delay: 10 seconds, 30 seconds, 1 minute, 5 minutes, 10 minutes or 30 minutes. Default 1 minute. When idle, go to: any item in your dock. Default: the first item. |
| Slideshow | Moves through every item in your dock after the Display has been left untouched. Touching the screen pauses it. Cannot be used at the same time as Auto-Return. See Slideshow below. | Off by default. Inactivity Delay: 10 seconds to 30 minutes. Default 1 minute. Dwell Times: 5 seconds to 1 hour, or Skip. Default 1 minute. |
| Auto-hide Dock | Hides the dock when the Display has been left untouched for the Inactivity Delay. Touch the screen to bring it back. | On by default. Inactivity Delay: 5 seconds, 10 seconds, 15 seconds, 30 seconds, 1 minute or 2 minutes. Default 10 seconds. |
Auto-Return and Slideshow share the same Inactivity Delay, so changing it in one also changes it in the other. Auto-hide Dock has its own Inactivity Delay.
Slideshow:
Slideshow moves through every item in your dock, one after another, in the same order as your dock. It can include your Predefined Screen, your Custom Screens, and TouchHub apps such as Home Assistant and Family Chores (to change the order, rearrange your dock in the Dock Configuration section). It starts after the Display has been left untouched for the Inactivity Delay. Touching the screen pauses it, and it starts again the next time the Display is left untouched.
It cannot be used when Auto-Return is enabled, and it cannot be scheduled for certain times of day. You need at least 2 items in your dock to use it.
Slideshow is similar to our Loops feature (see our article How to Create and Use a Loop), but they work differently:
| TouchHub Slideshow | Loop | |
|---|---|---|
| Plan | Free, Essential and Plus | Plus only |
| What it shows | Every item in your dock: your Predefined Screen, Custom Screens and TouchHub apps such as Home Assistant and Family Chores | Custom Screens only. The Predefined Screen and TouchHub apps cannot be added |
| Where you set it up | On the Display (Gear > Dock Settings > Slideshow). Each Display has its own settings | In your DAKboard account, in the Loops tab. The same Loop plays on every Display you assign it to |
| Order | Follows the order of your dock | Set in the Loop: drag the Screens into the order you want |
| Time on each item | 5 seconds to 1 hour, the same for every item or set per item. Skip leaves an item out | 5 seconds to 1 hour, set per Screen, or Clicking Next to change only when you tap Next |
| When it runs | Only after the Display has been left untouched for the Inactivity Delay | All the time, as soon as it is assigned |
| Touching the screen | Pauses it. It starts again when the Display is left untouched | Does not pause it. Tap to show the Previous and Next buttons and move back or forward |
| Scheduling | Cannot be scheduled | Can be added to a Screen Schedule |
To set it up:
- Tap the Gear icon on your Display, then go to Dock Settings > Slideshow.
- Turn on Enable Slideshow. If Auto-Return was on, it turns off.
- Tap Inactivity Delay and choose how long the Display must be left untouched before your slideshow starts: 10 seconds, 30 seconds, 1 minute, 5 minutes, 10 minutes or 30 minutes. It is set to 1 minute by default.
- Tap Dwell Times to set how long the slideshow stays on each dock item: 5, 10, 15 or 30 seconds, 1, 2, 3, 5, 10 or 30 minutes, or 1 hour. It is set to 1 minute by default. Tap Apply to all items… to use the same dwell time for every dock item, or tap an item to set its own time. Choose Skip on an item to leave it out of the slideshow.
Like the other Dock Settings, Slideshow is set up on each Display separately.
What you can include on each plan: On the Free Subscription, your dock can hold the Predefined Screen and the Home Assistant app. On Essential, it can hold any of your Screens plus up to 2 TouchHub apps. On Plus, it can hold any of your Screens plus up to 3 TouchHub apps.
Reload Content:
The Reload Content option lets you refresh your dock items or the whole TouchHub from your touchscreen. This way, you do not have to log in to your DAKboard account and use the Refresh Displays button to push changes to your Screen. Instead, open this option and tap a single dock item to reload just that item, or tap Reload Everything to reload all your linked Screens and apps and pick up the latest changes to your dock.
This option works on every plan, including Free, so you can refresh your Predefined Screen on command.
Frequently Asked Questions:
Below are the most Frequently Asked Questions about the TouchHub:
Is the TouchHub available on all subscription levels?
Yes, all three subscription plans support the TouchHub. The Free Subscription is limited to the Predefined Screen, plus the Home Assistant (HA) app. With the Essential plan, you can add any or all of your Screens to your dock and have up to two TouchHub apps in the dock at the same time. With the Plus plan, you can add any or all of your Screens to your dock and have up to three TouchHub apps in the dock at the same time, and more apps are coming soon.
Why Can't I Add Another App to My Dock?
Why this happens: Each plan has a limit on apps (Free: Home Assistant only; Essential: 2; Plus: 3), and each app can be in your dock only once. More apps are coming soon.
How to fix it:
- Check your dock in Dock Configuration. An app that is already in your dock is hidden from the Applications list.
- On the Free plan, only Home Assistant can be added. To add Family Chores Manager or your Custom Screens, upgrade to Essential or Plus.
- If you have reached your plan's limit, remove an app from your dock to add a different one.
Why Don't My Dock Changes Show on My Display?
Why this happens: Your dock changes save automatically, but each Display only picks them up when it checks for updates: about every 2 minutes on Essential, and about once an hour on Free and Plus (Plus Displays update right away when you click Refresh Displays).
How to fix it:
- On the TouchHub page, click Refresh Displays.
- Or, on the Display, tap the Gear icon > Reload Content > Reload Everything.
Why Are My Dock Settings Different on Each Display?
Why this happens: The TouchHub Settings (Dock Placement and Dock Settings, including Slideshow) are saved on each Display, not in your DAKboard account. The dock items themselves are the same on every Display it is assigned to.
How to fix it: Open the Gear icon on each Display and choose the settings you want there.
Why Does My Display Open on a Different Dock Item After a Restart?
Why this happens: When the TouchHub reloads, it returns to the item you were on. When the Display fully restarts, it opens on the first item in your dock. If Auto-Return is on, the Display always opens on the item chosen in When idle, go to.
How to fix it:
- To pick the item your Display opens on, turn on Auto-Return and set When idle, go to to that item.
- Or move that item to the first position in Dock Configuration.
Why Doesn't My Slideshow Start?
Why this happens: The Slideshow only runs after the Display has been left untouched for the full Inactivity Delay, and it needs at least 2 dock items that are not set to Skip. It does not run while Auto-Return is on, and it pauses while the TouchHub is not showing on the screen.
How to fix it:
- Tap the Gear icon > Dock Settings > Slideshow and check that Enable Slideshow is on. If the menu says it was turned off by Auto-Return, turn it back on.
- Check that your dock has at least 2 items, and that at least one other item is not set to Skip in Dwell Times.
- Leave the screen untouched for the Inactivity Delay. Any touch pauses the Slideshow and starts the wait again.
Why Does an Item in My Dock Show an Upgrade Page?
Why this happens: Changing to a plan with lower limits does not remove items from your dock. Items your new plan does not include, such as Custom Screens or Family Chores on Free, or apps over your plan's limit, stay in the dock but show an upgrade page when you open them.
How to fix it: Upgrade your plan, or remove those items in Dock Configuration. Your app data is kept, so it comes back if you upgrade again.
Helpful Articles:
Having trouble? See if these articles help.
How to Configure Home Assistant for TouchHub