TABLE OF CONTENTS
With the Custom Screens on your DAKboard paid subscription plans, you can add the Shapes Block to create effects on your screen. You can use this to make a Blue Light Filter (see our article Enable Night Shift (a.k.a. Blue Light Filter) on DAKboard for details on this), add a gradient for shading effects over other blocks or the screen, or add a background to your blocks to make them pop. This article will show you how to add the shapes block to your Display.
Add a Shape Block:
To add a Shape Block, open your Custom Screen editor, click the Add A Block button, open the Tools section, or search for the Shape Block as seen below:

Position your shape block where you want it to be, then use the Settings Tab to create your desired effect.
Settings Tab:
With the Settings Tab, you can select the shape you want to use for your effect. Here you can also select the colors, add a gradient, or even include borders around the shape. See below:

These settings are detailed below:
- Shape: This dropdown block allows you to select which shape you want to use. Currently, you can select between the Square/Rectangle shapes or the Circle/Ellipse shapes.
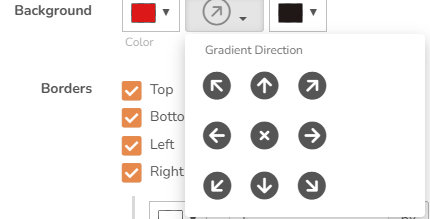
- Background: This allows you to select the background color for your shape. You can also add a Gradient and a secondary coloring for shading purposes. This will look like there are shadows in the block. The Gradient tool looks like this:

- Borders: This allows you to set a Border around your shape. Once you select which side of the Shape you want your border to appear, a pop-up menu will appear to allow you to select the color as well as set the thickness of the border in Pixels. See below:

Formatting Tab:
The Formatting tab has the Advanced dropdown menus. This links to special formatting you can do with your blocks. To learn more about this, check out our article Advanced Features of the Custom Screen Editor.
Schedule Tab:
This tab allows you to make it so the block is only visible on the days you want to see it. See our article Content Scheduling to learn how to use this tool.
Helpful Articles:
Having trouble? See if these articles help.
How to Use the Custom Screen Live Editor
Advanced Features of the Custom Screen Editor
Enable Night Shift (a.k.a. Blue Light Filter) on DAKboard
